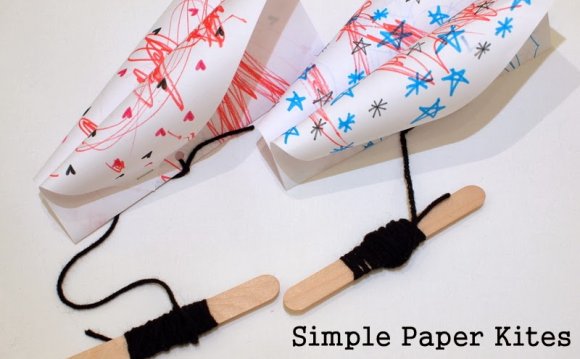
Place dowels along the edges and attach them securely to the paper. Alternatively, tie strings to the two main dowels and connecting all corners along the edges. Glue and tape string into folded edges. Cut off all the excess paper.
Step 6
After you’ve secured the kite structure, reinforce the kite by adding more tape to the edges and centre of the kite.
Step 7
Make two holes in the tape holding the vertical dowel in the middle, a few inches above the centre point to prepare to tie a string to the dowel.
Next, use the same method to make two more holes below the centre line.
Step 8
Feed a string through both sets of holes and tie them to the dowel on each end leaving a little slack, creating the keel of the kite.
Step 9
Use a strip of cloth attached to the bottom of the kite to make a tail for the kite. This helps the kite to fly with added stability. (If you would like, bow the vertical cross stick back a little with a “bow string.”)
Step 10
Tie a long string to the keel string, which you will hold to control and fly your kite. You may have it rolled up on a piece a wooden broom handle. Now your creation is ready to fly!
Step 11
Finished!
Handy Tips
- You should be able to get dowels or narrow sticks from any arts & crafts shop.
- The larger your paper, the better your kite flies.
- The heavier your materials, the more wind will be needed to get the kite up in the air.
- Be careful to keep your kite away from trees, or it may get stuck.
- Do not fly close to power lines as they will damage the kite and possibly even electrocute you if the string were wet.
- Do not try flying the kite in the rain, as the paper may tear.
- Pay attention to the weather; you don’t want to be struck by lightning!
Kite Terminology
Familiarise yourself with the structure of a kite:
- Spine: The vertical bar that a kite is built around.
- Spar: The support stick(s) placed perpendicular or slanted over the spine for horizontal support. These can be curved or bowed.
- Frame: The kite’s support structure, formed by the spine and spar attached together with string and/or tape.
- Cover: The paper, plastic, or cloth used to cover the frame for the body of the kite.
- Bridle: The string(s) attached to the spine or spars, used to control the kite in the air.
- Flying Line: The string running from the bridle that you hold to fly the kite.
- Tail (optional): A strip of paper or plastic that balances the kite in flight.
- Reel: The object used to hold and reel in the flying line.
- Keel: A strip of sail-like material that hangs under the kite to help stabilise it in flight. If present, you can attach the flying line to here instead of the bridle.
YOU MIGHT ALSO LIKE

Share this Post
latest post
-
 Kite Festival Houston August 5, 2018
 -
Kite Festival Houston August 5, 2018
-
 Kite birds California August 5, 2018
 -
 Afghanistan Kite running August 2, 2018
 -
 Kite flying Lessons July 30, 2018
 -
 Bali Kite Festival July 27, 2018
 -
 Rosebud Kite Festival July 24, 2018
 -
-
 Southsea Kite Festival July 18, 2018