

Introduction
These instructions cover the general steps of making a two-line stunt delta. Be sure to study the specific notes supplied with your plans. Just take one step at a time, and if you get sick of it, go flying or something until you're in the mood. These instructions are by no means the best or only way to make a kite, as each kite maker adopts a unique style. Study a finished kite to clarify the various construction methods.
Terms
Hem – the folded and sewn edge of fabric
Seam – the joint between two pieces of fabric
Leading edge (LE)
Trailing edge (TE)
Cyanoacrylate cement or Superglue (CA)
Sewing
Any well-tuned sewing machine should work for kite making. Ideally, a three-step zigzag, plain zigzag, and straight stitch are best but a simple straight stitch can be used by making two parallel stitches in place of zigzags. Learn to sew by practicing on kite bags or camping gear, things that aren't so critical. Read the manual, ask for help but stick with it. A lap seam and a simple hem are the basic requirements to sew kites.
 Examples of three-step zigzag seam and straight stitch hem
Choose a plan
A simple design with good instructions is a good start. Some plans have no instructions at all and consist of a sail plan drawing, spar sizes and bridle layout. Save these kites for when you have had some practice. A kite with a one or two piece sail, pultruded spars and a dynamic bridle would be a good place to start. You can always use fancy materials later as you gain experience.
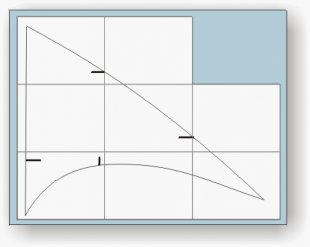
Make a template
The goal here is to get that half-sail plan onto a piece of stiff cardboard to use for layout and cutting at full size. The positions of spreader connections, T and standoffs are then marked on the template.
Plans are available as drawings in vector formats such as CDR, AI, DXF or bitmaps like JPG, GIF or BMP. In this case a drawing or bitmap program is helpful to print the layout at full size, or you can have someone with graphics skills to print them for you. I use Corel Draw, but AutoCAD, Illustrator and others are also good. Bitmaps can be handled with Window's paint program or the shareware Paint Shop Pro.
 Graphics files can usually be transferred between programs fairly easily, so you can usually find a way to get it on paper.
In the printer's dialog window set to print tiled pages, then preview the layout before printing. You should get a series of pages that can then be pasted to a sheet of poster cardboard. Align the sheets carefully when sticking them down and then cut the perimeter with scissors.
Plans are sometimes given as coordinates on a grid or by drawing a triangle and adding curves to its sides to develop the kite's profile. These will require some drawing to lay out the grid and mark the coordinates of the sail lines, but isn't difficult. If a plan says "Do Not Scale" on it, that means it must be laid out as lines by measurements because that drawing is inaccurate although the dimensions are good.
This sort of task involves measuring from left to right, then up and making a mark on your cardboard. Connect the marks and you have a curve. A spar with an adjustable bow string is a good guide to smooth these segments into a more graceful curve. Cut out the resulting template with scissors.
Cut the panels
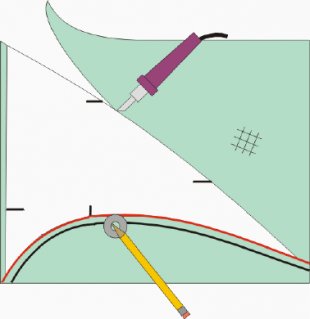 A wood burning tool from a craft store or a soldering iron with a sharpened tip cuts the fabric with a sealed edge that reduces fraying. Some kite fabrics resist fraying better than others, and can be cut with scissors or a razor knife.
Before cutting the fabric panels, be sure to leave an extra 10mm for the trailing edge to be hemmed, and an allowance for panel seams. One way to do this is with a simple flat washer having the distance from the hole to outer edge that matches your seam or hem allowance. This is used as a pencil guide to mark a line around the template onto the fabric. The leading edge can be hot cut directly along the edge of the template on a glass or masonite surface. An old window pane with the edges safely taped is best, but I use masonite for convenience. The heat of the cutter may vary as it heats up, and trial and error will show you when the cleanest cut occurs. If you're handy with wiring, a standard light dimmer can be used to regulate heat. Practice first on scraps and be sure to work in a well ventilated area to avoid breathing fumes.
When the LE is cut leave the fabric stuck down to the work surface and slide the template into a position to guide the cut along the lower TE pencil line. Shift the template into position to cut align with each section and cut it.
For a one-piece sail, fold the fabric in half along the spine parallel to the weave. Crease it down the spine and unfold it. Lay the template on one half of the sail at a time and cut each wings. For a two-piece sail, each half should align the weave with a line from the wingtip to the center of the spine. On multi-panel kites the weave is aligned in each panel to be parallel to the nearest spar or edge to distribute the load that may stretch the sail. To see what this means, pull opposite corners of a handkerchief, and then pull from opposing edges. This is what is best along spars and edges to reduce stretch. Allow an extra 4mm along the spine for each side of a two-panel sail to create an 8mm lapped seam.


YOU MIGHT ALSO LIKE


Share this Post
latest post
-
 Kite Festival Houston August 5, 2018
 -
Kite Festival Houston August 5, 2018
-
 Kite birds California August 5, 2018
 -
 Afghanistan Kite running August 2, 2018
 -
 Kite flying Lessons July 30, 2018
 -
 Bali Kite Festival July 27, 2018
 -
 Rosebud Kite Festival July 24, 2018
 -
-
 Southsea Kite Festival July 18, 2018