 Stan Kellar of California had a very informative web site aptly named Stan’s Toy Shop. Stan recently retired his website and has granted me permission to reproduce portions of his site. Hopefully this information will prove valuable to you, I know that when I first started building Stan’s site was very helpful.
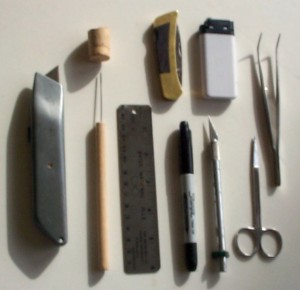
The template only needs to be of one-half of the kite, from spine to wing tip. Print the plan from your computer printer as tiled pages and assemble the sheets with a glue-stick or tape. Stick the plan onto a stiff piece of non-corrugated cardboard. Choose material that will guide a knife smoothly. If the kite has tabs that fold down over the bow-ends or a folded hem to reinforce the leading edge, provide them on the template. Cut the template out with sharp scissors or a razor knife and metal ruler. Mark the bridling points on the template along with any other information from the plans such as spar material, length or bridle dimensions. This is helpful if the kite becomes a favorite design or even if you give the template away.
 Cut the sail
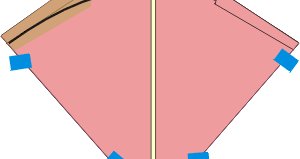
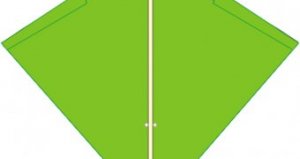
Cut a piece of Orcon, polyester film or other fabric slightly larger than the finished kite will be. On a flat hard surface such as glass or Formica, fold the fabric in half along the axis of the spine. Lay the template on the fabric, aligning the spine of the template with the folded edge. Cut smoothly around the template with a sharp razor knife while holding the template down firmly. This should produce a symmetrical sail.
Felt-tipped pens, acrylic paints or fabric dye pens work pretty well for Orcon kites, and polyester film can be spliced together in patterns but some of these fun methods can add weight and imbalance. The transparency of white Orcon lends itself to easy tracing of designs with paints or markers. Bold designs are more visible in the sky. Reinforce leading edge
I run a piece of clear wrapping tape along the leading edge from spine to just past the inside edge of the tab for the bow, leaving a 1/8″ or 4mm strip, and cut away the excess. A razor knife guided by a straightedge works best. This prevents starting a rip here, especially when using poly film sails. Some kites use a glued and folded hem to serve the same function.
 Make spine from bamboo
Many kites have carbon rod for spines and curve them with tensioning lines. I use bamboo because it’s cheap, holds a bend without lines and fastens easily to the sail. Carbon likes to poke through tape at the nose, while laughing in a tiny voice.
Starting with a piece of bamboo about an inch (26mm) or so in diameter, split it in half lengthwise with a sharp knife. Make the split as straight as possible. Gloves might be helpful to avoid splinters, I guess. Keep a box of bandages nearby for luck. Now split one piece from one of these halves, about 6mm or 1/4″ wide, steering the blade by twisting it to keep the cut parallel to the first split, giving you a rough spine. Shave this strip down with a razor knife by pulling the blade along, with your thumb pressing the bamboo against the blade. Sight down its length as you work and try to correct any curve that develops. As you work, go for a rectangular cross-section, with the skin on the long side. For lighter or smaller kites shave it down to a smaller width. If you make a bundle of them, you can later select the right size for the kite you are making. The piece you have produced will likely be curved slightly with the outer skin of the bamboo on the outside of the curve. Since the skin side is denser than the inside of the plant, this is normal. Keep in mind that the skin of the spine will go against the sail of the kite. Cut the spine to length a bit longer than the kite.
Getting the right spine thickness is a matter of practice and flexing the spine, testing the feel and trimming accordingly. Some plans give dimensions, but bamboo stiffness varies.
Most fighters have a curve in the spine that starts below the bow and bends the nose back a bit. Bending the spine over a hot light bulb works well although other heat sources will work. Bend it gently, as more curve can be added while flying by flexing it occasionally.
Attach spine to sail
Many types of adhesive or tape can hold the spine in place. I prefer vinyl tile adhesive, applied with a cotton swab. A quart of this water-based sticky stuff is $4 at Home Depot. The glue I use for the bow would also work here, but the tile adhesive is a little easier to work with. Coat the skin side of the spine lightly, and set it aside to dry. Now fold the sail in half down the middle with the back on the outside. Run a line of glue lightly along the edge and let this dry for a few minutes. With the sail laying flat on its face, line up the spine above the kite and press the nose in place first. The glue will grab it tightly, so take care in the positioning. Now lightly push the spine toward the nose to stretch the sail flat and “rock” it down against the sail. Now trim the ends of the spine to the edge of the sail.

YOU MIGHT ALSO LIKE

Share this Post
latest post
-
 Kite Festival Houston August 5, 2018
 -
Kite Festival Houston August 5, 2018
-
 Kite birds California August 5, 2018
 -
 Afghanistan Kite running August 2, 2018
 -
 Kite flying Lessons July 30, 2018
 -
 Bali Kite Festival July 27, 2018
 -
 Rosebud Kite Festival July 24, 2018
 -
-
 Southsea Kite Festival July 18, 2018