 Spring has arrived and despite the abysmal weather (high temps for the week will only be in the mid-30s once again), I am determined to shake the winter blues from my classroom. I removed the oh-so-adorable stained glass mitten decorations that my students created in January and was ready for a replacement decoration that said “Spring is Welcome here!” After a lengthy debate, I eventually decided that kites would be the perfect decoration for our classroom windows.
Like all my stained glass art projects, this craft required only 3 materials: construction paper, tissue paper squares, and clear contact paper. Students will also need scissors at the end of the project.
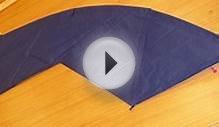
 I wanted the kites to be BIG and make a bold statement in my classroom windows, so I cut the 1/2″ frame for each kite from a 12×18″ sheet of black construction paper. While the class was at library, I peeled a 12×18″ sheet of clear contact paper, placed it sticky-side-up on each student’s desk and gently set a black frame on top of each sheet of contact paper.
When students returned from the library, I was ready for them! Each child was given verbal instructions for the project (a task that was easy because we have already made several stained glass decorations this year) as well as also cut 1/2″ strips that were 18″ and 12″ to complete the inside of the frame. The children laid the two strips in a perpendicular way to connect opposite corners.
Once the perpendicular strips were in place, the students filled in the four kite areas with tissue paper squares. I wanted to have a unified look of some type with their kites, so the class was given instructions to use only two colors. Matching colors were to be used in opposite sections of the kite. Although the directions were simple, it was intriguing to see the variety of ways my students interpreted the instructions. The completed projects offered such a beautiful variety of colors.
Once the kites were completely filled with tissue paper squares a second sheet of clear contact paper was added to “seal in” all the pieces and prevent the loss of stray tissue papers.
Each student then used scissors to trim the excess plastic from around their kites.
The completed kites were attached in my classroom windows with clear tape.
I LOVE how perfect these kites fit with my classroom decor and the decorations on display above each window.
So now the big question:
Do you think these new decorations will finally bring spring weather to Michigan?
Looking for more window decoration projects? Click any of the links below to see my other stained glass creations that I’ve made with my kinders. They look beautiful on the windows and are very fun to make!


YOU MIGHT ALSO LIKE


Share this Post
latest post
-
 Kite Festival Houston August 5, 2018
 -
Kite Festival Houston August 5, 2018
-
 Kite birds California August 5, 2018
 -
 Afghanistan Kite running August 2, 2018
 -
 Kite flying Lessons July 30, 2018
 -
 Bali Kite Festival July 27, 2018
 -
 Rosebud Kite Festival July 24, 2018
 -
-
 Southsea Kite Festival July 18, 2018