 Isn’t there something about Summer that makes you want to be a kid again? Homemade ice cream, the sound of lawnmowers and Marco Polo. Drippy popcycles and fireflies and long lazy days in sundresses. And flying kites. Of course. Well, this is Summer made so much more special. Because JoPhoto is teaching us all how to make a kite of our very own. With any fabric that makes us happy. And it couldn’t get any cuter. Click here to see even more and we’re DYING to see the kites you make so send us some pics if you decide to tackle this!
Two wooden dowels or straight sticks
Scissors and a craft knife
String or twine
Glue
Lightweight fabric, nylon, or plastic
Ribbon or extra fabric for the tail
Knitting needle or hole punch

Cut a notch in both ends of the sticks using a craft knife. The notch should be deep enough for the string or twine.
Mark the center of the stick that will be horizontal. Make a cross using the two sticks. Place the horizontal stick about 2/3 of the way up on the vertical stick. Make sure the horizontal piece is at a right angle to the vertical one. Tie the two sticks together by wrapping the string securely around the center points making a crossed pattern. After the sticks are secure, tie a knot with the string.
Note: Do not cut the long end of the string yet! Wrap the long end of the string and secure it to the notch at the top of the vertical stick. Work your way around the kite, placing the string in the notched points. You will create a frame for the kite. Remember to keep the string taut, and wrap the string back to the center of the kite frame, and tie a knot again to secure the string.
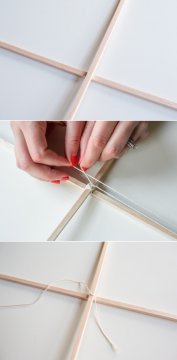
Wrap the long end of the string and secure it to the notch at the top of the vertical stick. Work your way around the kite, placing the string in the notched points. You will create a frame for the kite. Remember to keep the string taut, and wrap the string back to the center of the kite frame, and tie a knot again to secure the string.
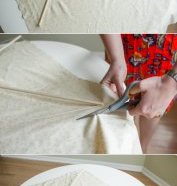
Lay the kite frame on top of your fabric or nylon and cut the fabric around the frame, allowing at least an extra 1-2 inches all the way around.
Fold the fabric or nylon over the edges of the kite frame and glue to secure. Reinforce the top and bottom tips of the kite with extra glue.
Use a hole punch or knitting needle to create a hole at the top and bottom of the kite. Cut string and thread one end through the top hole and the other end through the bottom hole. Secure both ends with a knot. This string is the kite’s bridle.
Tie the end of the flying string to the bridle—about 1/3 down from the top.
Attach additional string to the bottom hole and tie cloth bows or ribbons for the kite tail.
TIPS ON FLYING A KITE
from JoPhoto
Weather: Check the weather for wind conditions in your area. As a general rule, if it’s a breezy day and you see branches blowing, the wind should be strong enough to fly your kite.
Where to fly: Clear, open areas like fields and parks are best for flying. Avoid power lines and trees.
How to fly: Begin by standing with your back to the wind. Hold your kite up by the bridle and let the line out. If there’s enough wind, your kite will go right up. Let the kite fly away from you a little, then pull in on the line so it will climb. Repeat until your kite gains enough height to find a good, steady wind.
Join The Conversation
favorite (0) share share (0) tweet (0) pin (0)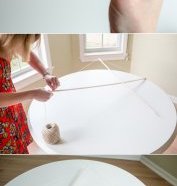


YOU MIGHT ALSO LIKE


Share this Post
latest post
-
 Kite Festival Houston August 5, 2018
 -
Kite Festival Houston August 5, 2018
-
 Kite birds California August 5, 2018
 -
 Afghanistan Kite running August 2, 2018
 -
 Kite flying Lessons July 30, 2018
 -
 Bali Kite Festival July 27, 2018
 -
 Rosebud Kite Festival July 24, 2018
 -
-
 Southsea Kite Festival July 18, 2018