
- Your kite is not performing properly. First check if you have assembled it correctly. Check that the bridle lines are not wrapped around any spars, and then check the bridle setting.Kite turns immediately into the ground on lift off. First check that the right line goes to the right side of the kite and vice versa, secondly check the flying lines are the same lengths. If one line is longer than the other the kite will always tend to turn to that side, thirdly check that your bridle settings are the same.
- The kite is very fast or very slow. The length of your flying lines can have quite an effect on the kite's performance. Short lines will result in the kite being very fast and responsive while very long lines will make the kite slow and sluggish.
- Twisted/tangled lines, caused by unwinding lines off the reel/handle in the opposite direction to which they where wound on. To get the twists out, unwind you lines completely and then starting at one end walk along the length of the line running it through your hands and easing the twist along until it unwinds completely at the other end. One way to avoid this happening again is to make sure when you first start unwinding the lines they are coming off the reel un-twisted and to keep it in your hand in the same position to wind on and wind off the line.
- Strong Winds. In very strong winds you might find it easier or more comfortable to sit down and fly.
Landing a stunt Kite
Adjusting the bridle lines of a stunt kite
A kite's bridles sets the "Angle of Attack" of the kite to the wind. The "Angle of Attack" is that angle at which your kite is tilted away from the flyer. The bridles have been pre-set and you should not attempt to adjust them until you have first flown the kite.
The kite wing operates efficiently in only a narrow range of angles of attack. This being approximately 4 to 12 degrees, this can best be seen by lying your kite with it's back on the floor, now take the line attachments in your hands and lift the kite off the floor, lift by the same amount with each hand. The nose of the kite should lift off the ground first and be about 8cm off the ground before the rest of the kite lifts off, this is set at about 4 degrees. If the kite lifts off the ground evenly and lies almost flat to the ground then the kite is set at about 12 degrees.
To fine tune your kite to attain its full potential is recommended and very easy to do, if you follow the instructions carefully. Mark the current setting and use this point as a reference. Remember adjustments must be made in small increments and both sides must be adjusted equally.
If you move the rings down (away from the nose) the effect will be as follows:
- The kite will turn tighter and handle better in light winds
- Speed will decrease
- Pull will increase
- Snap-stalls will become easier
- Launching will become more difficult
As you move the ring further down, any advantages will disappear and the kite will become impossible to fly with any pull on either line, resulting in an overstearing turn and stall.
Moving the bridle rings upwards (towards the nose) will have the opposite effect until the kite will struggle to turn while having very little pull.
Determining the best performance of the kite will depend on you, as each person's ideal balance of speed, turning and ease of launch will vary.
Don't be shy to adjust your kite, as with experimentation you will learn to get the best results out of your stunter.
Stunt Kite maneuvers
With a little practice you should be able to fly the patterns illustrated below. These can be great fun especially if flown as team maneuvers:
Stacking Stunt Kites
You may have seen stunters flying one above the other, from two up to as many as 10 or more. This is called stacking and results in exceptionally high tensions which can create opportunities such as jumping and skiing. Bear in mind that this has the potential to be very dangerous and unless you are keen to see the inner workings of a hospital, we suggest you venture into this side of the sport with caution.
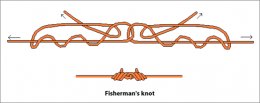
Stacking lines for deltas consists of FIVE lines with overhand knotted loops at each end, each between 60-90 cm (24-35 in). All stacking lines MUST be exactly the same length, 80 cm (31 in) is usually the standard length. The 5 lines connect onto all the bridle connection points and then on to the corresponding points on the following kite and so on. If you find the kites jostle when in flight, shorten the length of all the stacking lines. As the number of kites stacked increases, so will the pull and you will have to change your flying lines to be able to cope with the increase in tension.
This is a very simple process if you follow the steps below and consists of attaching 5 lines to each of the bridle connection points on the lead kite to the corresponding positions on the following kite.
- Set up the kites in the order you want them to fly. This system is suitable for stacks of up to four kites depending on the size of kite.
- Starting with the lead kite feed the stacking line through the wing slot and over the fitting. Do this for all four leading edge connectors.
- The following kite is connected the same way.
- The spine line is now connected and adjusted to fit. The slipknot is then locked in place.
- Hold the kites by the bridle loops of the lead kite and make sure all lines are equally tensioned. Adjust if necessary. The stack is now ready to fly. Remember that kite stacks can produce a lot of power so be careful!
Maintenance and care
Your kite is not indestructible! Flying in extreme conditions as well as frequent crashes will take their toll. A few simple measures in caring for your kite will ensure many years of enjoyment.
- Stay away from obstructions such as barbed wire fences, trees and poles etc.
- You will soon find that dogs have almost the same enthusiasm for kites as fliers do - but remember the dog usually has more destructive ideas in mind. It may be fun to tease the dog but what goes up must come down and he will be waiting!
- Clean your kite with a trickle of cold water and never use solvents, as this will remove the protective coating. It is imperative to clean your kite if it has been for a swim in the sea. Salt, even in the form of airborne spray, can play havoc with rubber fittings and reduces the performance of the fabric.
YOU MIGHT ALSO LIKE

Share this Post
latest post
-
 Kite Festival Houston August 5, 2018
 -
Kite Festival Houston August 5, 2018
-
 Kite birds California August 5, 2018
 -
 Afghanistan Kite running August 2, 2018
 -
 Kite flying Lessons July 30, 2018
 -
 Bali Kite Festival July 27, 2018
 -
 Rosebud Kite Festival July 24, 2018
 -
-
 Southsea Kite Festival July 18, 2018